Wednesday, December 15, 2010

More sewing projects....

Halloween table runner was made using a computer applique program. A fun and easy project.
This Holly table runner was another fun and easy project. The pattern was part of the Sweet Pickins club. The holly is appliqued.
I quilted the center sections using very small stippling. We had a class which was very helpful with different cutting instructions than what came with the pattern.
This table topper was done using the Snowman Collector's cd. I'm looking forward to doing a winter quilt using this program. I'm thinking of using blues next time.I enjoyed making this Fall pumpkin table runner with appliqued stems and my favorite, Batik fabrics.
This Pumpkin table topper has quilting using a pre-programmed quilt pattern in my Bernina machine.This is a Christmas wreath wall hanging. It was done using the Little Twister tool for cutting the squares. This was a fun and easy project.

Tuesday, November 02, 2010

Quilt Big Bag......

My "Big Bag" was just finished yesterday. I took a class on making it at the Bernina Sewing Centre. This is a really BIG bag. It's made for carrying quilts to the quilt shop, i.e. for long arm quilting, etc. I'm sure the bag could be used for other things. I'm using it this week to carry some projects to sewing Creative Club for "show and tell". The bag has three large pockets inside on one side and a zippered pocket on the opposite side. The pattern is called the "Great Big Bag" by Crocus Lane Quilts. The instructions in the pattern are not real clear and I don't think I could have sewn it without doing a lot of ripping had it not been for Mel at the BSC.

Saturday, October 23, 2010

Halloween projects.

Made these Halloween pillow cases for Kierstin and Haley. They can use them for sacks if they go trick-or-treating or just as pillow cases. Hope they are not getting too old for this kind of stuff. If they are, oh well. They can save them for their kids. :)

Another Table Runner....

Finished another Christmas table runner this afternoon. This one was made from the leftover scraps from the Christmas tree skirt I just finished. I used some crystals to add a little bling to the center of the poinsettia flowers at the center of each of the stars (hard to see in the pics). There is a Christmas gift exchange coming up so I'm thinking of making this one my gift item.

Tuesday, October 19, 2010

Christmas Tree Skirt, etc.......


The patterns for this Christmas Tree Skirt and Table Runner were from the book "Christmas Traditions in Stained Glass by Brenda Henning. These sewing projects were very time intensive. Not sure if I want to try them again, though they are beautiful. The metallic gold bias tape was a nice touch giving that stained glass look. The pictures just don't do them justice. Can't wait to use them during the Christmas holidays.

Thursday, October 14, 2010

Sewing Basket

This sewing basket was another fun sewing project. The pattern was from the Art To Heart book "Sew Necessary" by Nancy Halvorsen, which has a lot of cool sewing projects. I selected the matching blue and yellow daisy fabrics with coordinating fabrics for the pockets and used blue webbing for the handles and added the matching fabric. The completed basket measures approx. 15"x8"x8" and has a large scissor pocket, rotary cutter pocket, three pencil size pockets, five thread spool pockets, four miscellaneous pockets, a daisy pin cushion and a small heart scissor holder. The instructions were a little difficult, but Cheryl, our instructor, made them more clear and enjoyable. I can't wait for our Sew Creative Club meeting for show and tell.

Monday, September 27, 2010

Texture Magic Purse.....

This is the purse I made in class yesterday using "Texture Magic". In case you don't know what TM is, it's a paper material which is layered on your sewing project. First the main fabric, then the batting followed by a layer of the Texture Magic. I drew lines on the TM to create the quilting pattern which can be done with straight lines or doing free motion quilting with the BSR foot. Sewing the straight lines took a lot longer than the free motion with the BSR. Once that's done you simply place the layered fabric with TM up on the ironing board and begin steaming, holding the hot iron just above the TM as you don't want to touch it with the iron. I used a piece of silk organza as an ironing cloth between the iron and the TM which worked great. It was fun to watch the TM crinkle up as it was steamed. I chose a floral fabric for the center section with coordinating fabric for the top and bottom bands and lining which has several pockets. I used the BSR to do free motion quilting on the top and bottom bands. I will add a hard bottom on the inside for support and it's done. This was a fun bag to make and I'm looking forward to making another one.

Friday, September 24, 2010

Swanky Bag....Before and After........

BEFORE AND AFTER.....Just to give you and idea of how it begins. Today I finished this tote bag. It's from Sherri K. Falls' This & That pattern called "Swanky Bag". I'm always amazed at some of the patterns quilters come up with. I learn so many helpful tips and shortcuts from the instructors at the Bernina store sewing classes. This bag went together pretty easily with Connie's helpful instructions. Though, don't get me wrong, it did take me all day. It was made with various cotton Batik fabrics. I had a great time picking out and putting together the various colorful fabrics. I later added pockets using the same fabric as the lining material. I plan to add a hard bottom too.

Thursday, September 23, 2010

Travel Case For Sewing Tools, etc........

Today I made a little travel case for carrying supplies to sewing classes. It was made using pretty Batik fabrics in greens and blues. My new Bernina #43 Free Motion Couching foot made applying the cording easy. Can't wait to use it on other sewing projects. I also used my new #38 Piping foot to help attach the Velcro. It's also a good foot to have for working with straps. This was a fun project which took only a couple of hours to make. I might just make another one soon. Tomorrow's class is making a purse. The Bernina sewing classes really help me become more comfortable with using the speciality feet.


Tuesday, September 21, 2010

More sewing.....

Today I finished the billfold which matches the purse I made for my daughter, Sherry. This project was a little tricky for me. Not sure if I'll make another one like this or not at this point. I used mostly the same fabrics I used on Sherry's purse. This billfold has a grommet with one inch elastic for the closure. The inside has eight credit card slots and a place to put a check book behind them. On the lower section is a change pocket with a Velcro closure.I finally finished the center embroidered medallion for my Floral Visions quilt. I added the outer blue sashing today. I still need to add the outer binding, the backing, batting and quilt it all together then add the binding.

Thursday, September 09, 2010

Scrap Therapy

Just finished these two projects. The cell phone case was made from some left over fabric from making the matching purse. The snap and strap was one I had saved from who knows what. This was my first attempt without a pattern. The next one should go together much easier. I'm going to try some velcro closures made to attach to fabric using heat. My plan is to make one each for Sherry, Haley & Kierstin, to match the purses I made for them.

Thursday, September 02, 2010

Double Diamond Table Runner


I completed another table runner using the Double Diamond cutting tool. This was actually a fun easy project, once you get used to using the cutting tool for the center pattern. I did realize later that I should not have used the geometrically lined pattern fabric for the outer boarder, since I didn't get it cut and sewn perfectly straight. But, this is a learning process, so I'll know better on the next one. Of course no one, but me, will notice when this is placed on a table and covered with plates of food, etc.

Sunday, August 22, 2010

Table Runners

I enjoyed working on these table runners. The blue one was done using the "Tucker Trimmer" ruler which was a great help in getting the triangles cut evenly. It was fun picking out coordinating fabrics and seeing them come together for a beautiful table runner. Can't wait to use it this Fall.
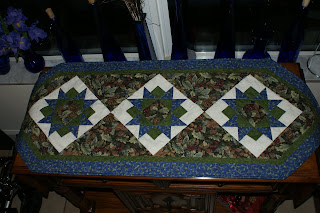
I did a "stitch in the ditch" around the stars which made a cool pattern on the back side of this runner. The stitches are supposed to be hidden in the "ditch". I still need practice on this technique, but I'm getting better. For me it's a slow process. This table runner is called "Harvest Homecoming" and was a sewing class project. This was an easier one to make, but still took time. I enjoyed using my BSR free motion quilting foot on my Bernina sewing machine to more quickly finish these projects.The back side of this table runner has a very nice coordinating fabric with leaves and berries. This runner could actually be used on either side.

Saturday, July 31, 2010

Floral Visions Blocks...continued....

Finished four more blocks for my Floral Visions quilt. Most blocks are taking me around two hours +/- to complete, what with thread color changes, etc., depending on the interruptions. This group picture loads vertical instead of horizontal for some reason. The following pictures are in the correct positions though......
This machine embroidery is so addictive. I must make myself stop so I can clean house, eat, etc. At least it gives me something to do while inside avoiding the 98+ degrees temperatures outside. So far I've finished doing the machine embroidery on eight blocks. I'm not sure if I'll have twelve or fifteen blocks for a king size quilt. Guess I could just go with nine blocks and make a wall hanging. We'll see. I could design new blocks or repeat some of my favorites, although I do enjoy the designing process.